End User License Agreement
(EULA)
This tutorial, herein referred to as the “product”, is provided as-is with no warranties either expressed or implied. The publisher retains all copyright ownership and reserves all rights to this product. Paid for “Donation/Purchase” versions of this product are only available directly from the publisher, or an authorized vendor/reseller as determined by publisher.
* You MAY copy, share or distribute unmodified copies of this product in PDF form only without prior written permission from the publisher. You MAY post unmodified copies of the PDF on social media, directly on web pages, or as links in online forums. You MAY create, copyright and sell poses using the techniques contained within this product.
* You MAY NOT modify, change or create derivative works based upon this product in any form or fashion or by any method. You MAY NOT sell this product or include this product in any package or collection that is for sell. You MAY NOT claim authorship in any form to this product.
By using this product, you agree to fully comply with all portions of this license. If you do not agree with this license, then do not use this product and destroy/delete all copies of this product in your possession.
This complete page page, including text and images, is copyrighted material owned by Winterbrose Arts and Graphics which may not be copied or used without prior permission.

Copyright (c) 2014-2020, Winterbrose Arts & Graphics. All Rights Reserved.
Table of Contents
Chapter 1: Introduction
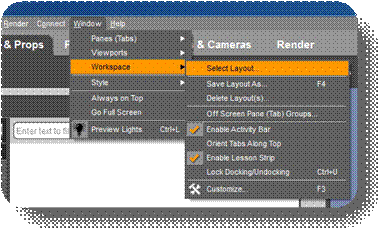
In DAZ Studio, there are multiple layouts that you can use. To find them and change your settings, go to Window->Workspace->Select Layout.
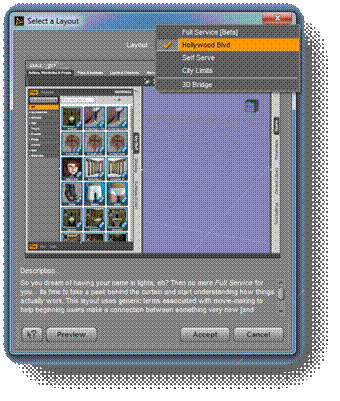
This tutorial will be using the 'Hollywood Blvd' layout. Choosing the same layout setting will make it much easier to follow along.
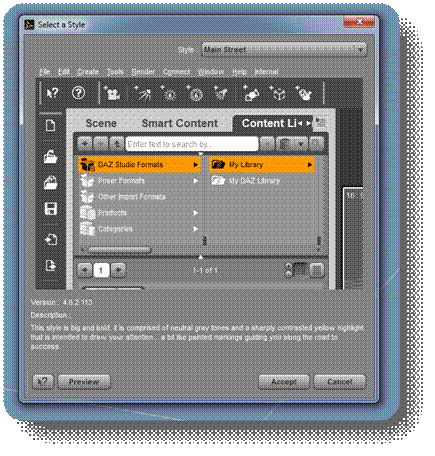
In DAZ Studio, there are multiple styles that you can use. To find them and change your settings, go to Window->Style->Select Style.
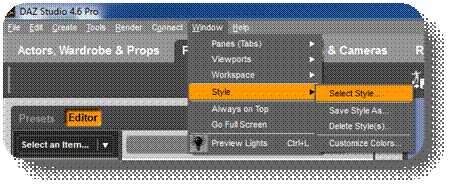
A style window will popup. Select the 'Main Street' style, then hit 'Accept' in order to use the same style that we use in this tutorial.
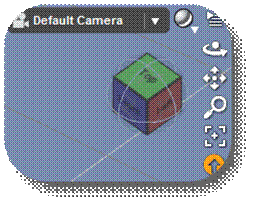
The first time you open DAZ Studio, you'll see your scene (shown below). It may initially be empty, but there are a few controls to the top right of it that will help.
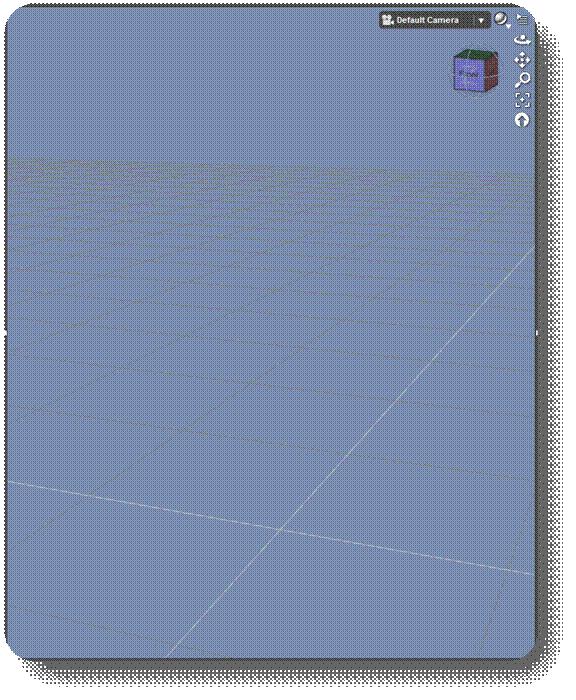
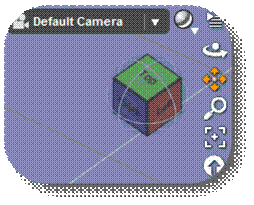
Here you have your basic view controls. When you move your mouse cursor over each control, it will highlight.

First off, there is the Cube that you use to rotate your camera view. Just left-click on it, then drag your mouse to rotate your camera view.
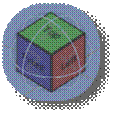
You can also left-click individual sides on the cube, to go directly to those accurate vantage points. Any part of the cube can be used, even the corners.
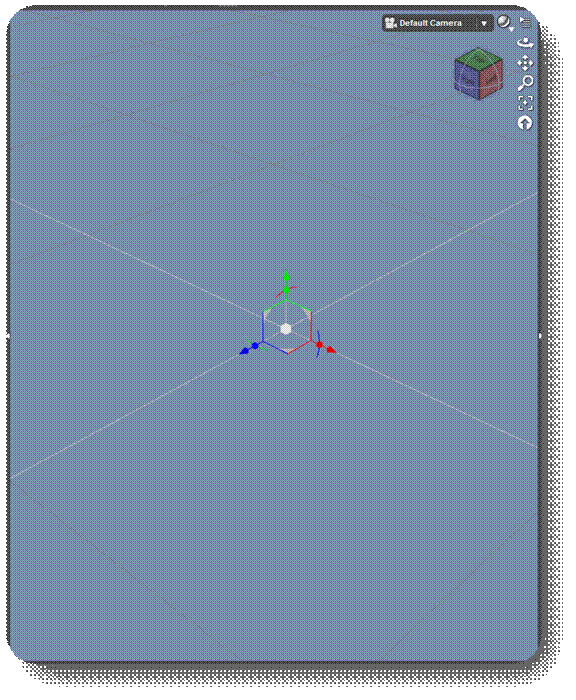
This is your View: Orbit. Left-click it and drag your mouse to freely rotate your view.
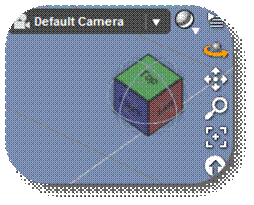
This is your View: Pan. Left-click it and drag your mouse to pan your view left to right as well as up and down.
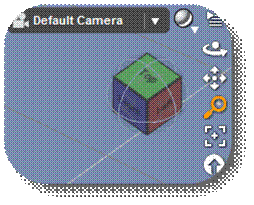
This is your View: Zoom. Left-click it and drag your mouse up and down, or left and right. Doing so will zoom your view in or out to see up close or farther away.
This is your View: Frame. Left-click it to have whatever object is selected appear in the entire frame of your view.
This is your View: Reset. Left-click it to reset your view to the default settings.
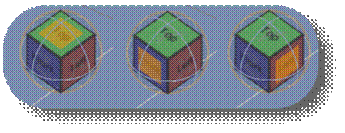
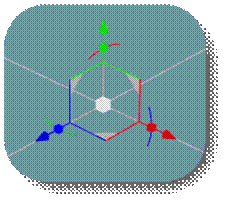
To work in DAZ Studio you must understand that there are three directions in 3D space, X, Y, and Z.
The red ray is the X-Axis, which runs left and right.
The green ray is the Y-Axis, which runs up and down.
The blue ray is the Z-Axis, which runs forward and backward.
Let's add a simple shape object into our scene. Go to the Menu and then click on Create -> New Primitive.
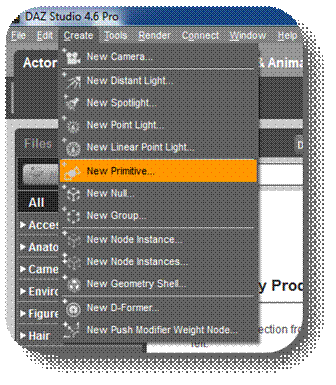
A pop-up window will appear for our new primitive object. We want to make a Cube, so if needed change the type to Cube then go ahead and hit 'Accept'.

Your new cube will appear in the middle of the scene.

Left-click on your cube to select it. Once you do, you will see directional rays pop up (shown below). You can use these rays to translate (move) your cube. By moving your mouse over one of the arrow tips and left-clicking, you can drag your mouse and move your cube along the axis chosen.
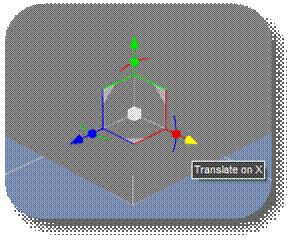
You can also translate along 2 axes at the same time by left-clicking on the triangular corner of both axes, then dragging your mouse.

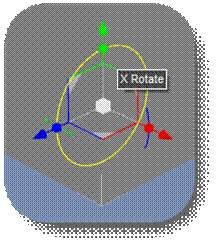
Not far down from the arrow-tip of the axes rays, you will see a colored Arc. When you move your mouse of it, it will turn into a yellow (or highlighted) circle. Left-clicking on the circle and dragging your mouse will rotate your object around that axis. The color of the arc signifies which axis it will rotate on.
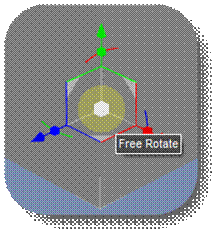
In the middle of the rays, you will see a very small cube. If you move your mouse right outside of the cube, a solid yellow circle will appear. You can then left-click and drag to freely rotate your cube along all axes.
The third thing you can use these directional rays for is to scale (resize) objects.
At the center of the arcs we talked about in the previous section, there is another very small cube. By left-clicking and dragging one of these with your mouse, you can scale your object along the selected axis.
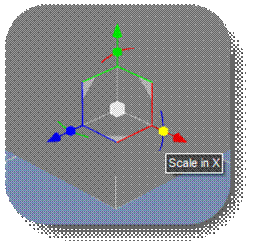
Lastly, you can instead scale the entire object along all axes by left-clicking the cube located at the very center of the directional rays and dragging your mouse.

Chapter 2: Scenes
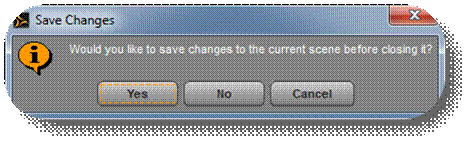
Let's create a New scene to work in.
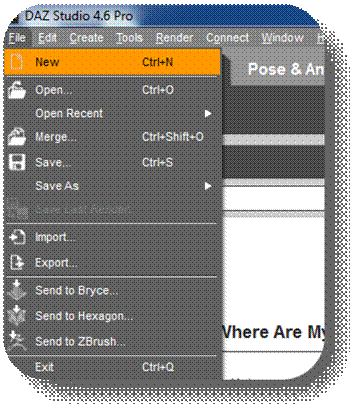
You'll be asked if you want to save your current scene. Click 'No'.
The Content Library is pretty much just what it sounds like, it is a one stop shop for all of your objects, poses, or any files (called content) that can be used within DAZ Studio. The content library can be found by clicking the 'Content Library' tab found on the right of your scene.

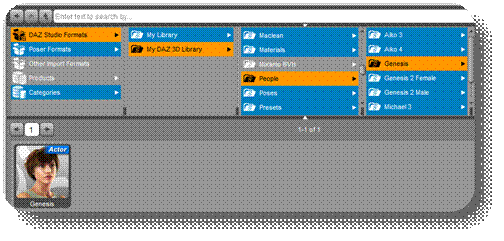
We'll be working with the Genesis figure, found in the Genesis Starter Essentials bundle, so let me show you how you can find it in the Content Library.
You can find Genesis by following the hierarchy:
DAZ Studio Formats -> My DAZ 3D Library -> People -> Genesis
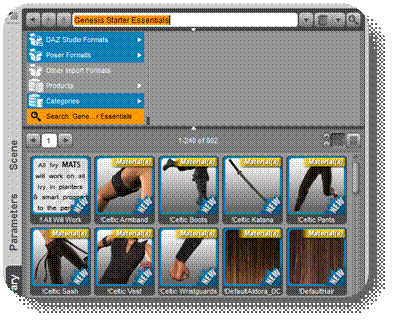
Additionally, you can use the Search Bar found at the top of the content library to find specific files or categories of files. For example, below I searched for all files included in Genesis Starter Essentials.
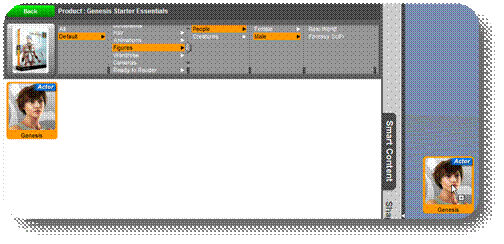
In addition to the Content Library, you can also use the Smart Content section by clicking the 'Smart Content' tab, on the left of your scene.
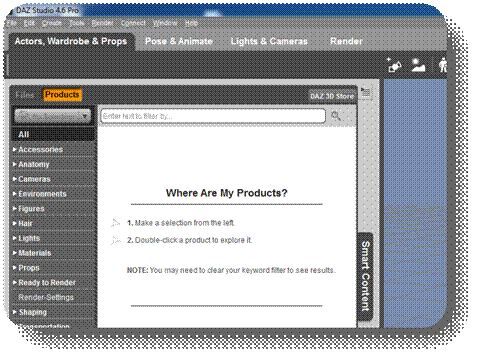
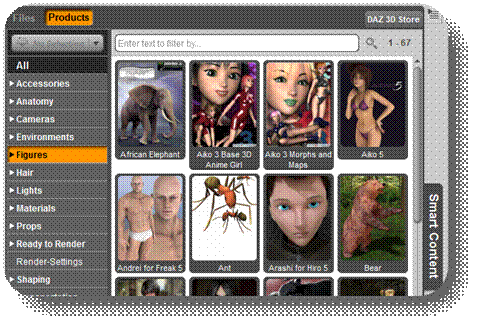
Smart Content is similar to the Content Library, but can be easier to use since you can search for All of a specific category of file types, such as looking up all the Figures you have downloaded, which can be done by clicking 'Figures'.
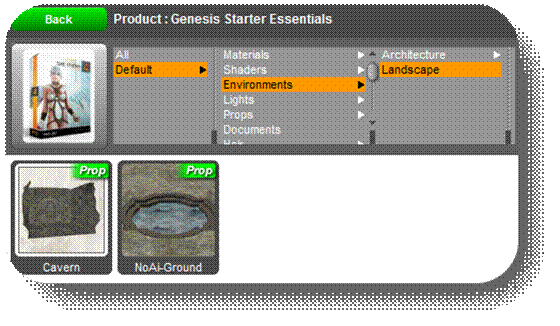
Just like the Content Library, you can search for files in the Search Bar. Since we are going to be using Genesis Starter Essentials, go ahead and look for the Starter Essentials bundle by going to Products, then All, then typing in 'Starter Essentials' into the search bar.
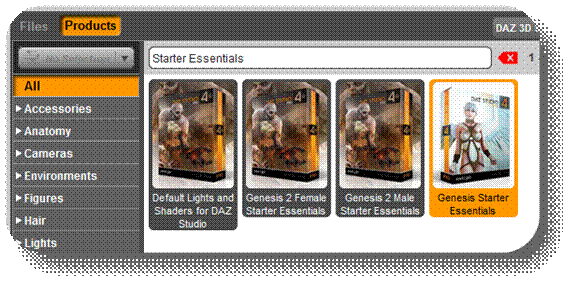
If you double click the 'Genesis Starter Essentials' it will open up all the contents within it in the Smart Content section.
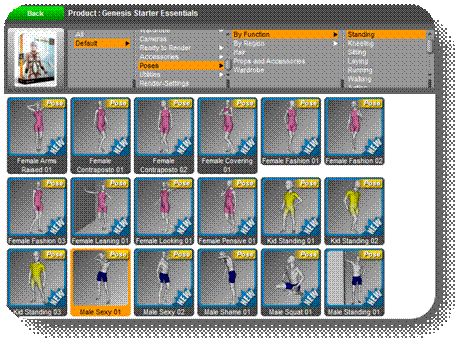
Once you have it opened, you will see a hierarchy of categories. Find the Genesis figure by following the hierarchy shown in the image below.

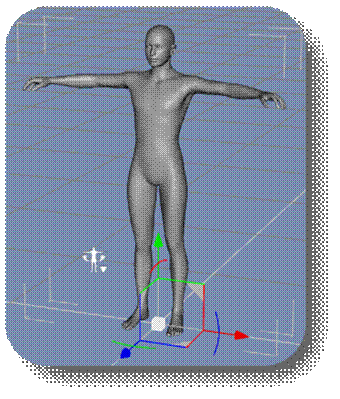
Now we are wanting to add the Genesis figure to our scene. There are two ways that this can be accomplished. You can double-click the Genesis figure icon, or you can hold down your left mouse button over the Genesis figure icon and drag it into the scene. Both ways will load the figure into the scene. Use this technique for any other things you want added to the scene.
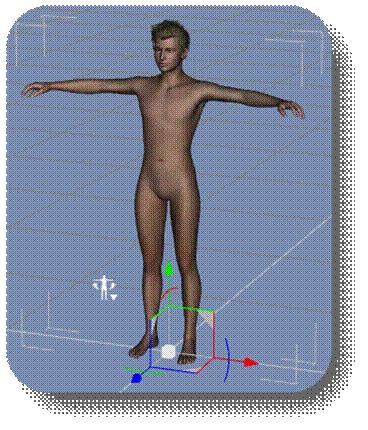
Once you load in the Genesis figure you'll see it in the center of your scene.
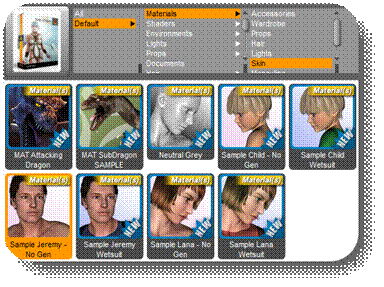
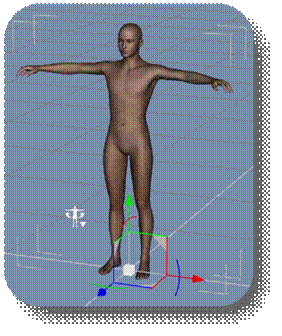
Now that we have our figure, we can start adding objects to it. To start with let's add a skin to our Genesis figure. The skin will change the default gray color into a more realistic look. Let's use this Sample Jeremy skin. Add it to the scene like you did the Genesis figure.
If loaded correctly, the Genesis figure will have a more realistic look with their new skin.
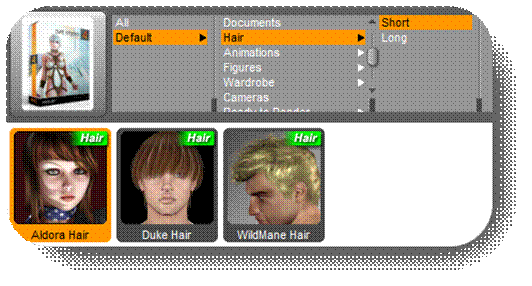
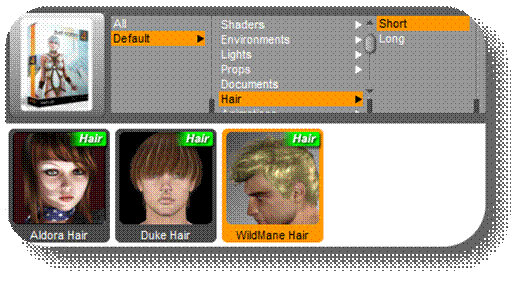
Now let's add the WildMane Hair to Genesis.
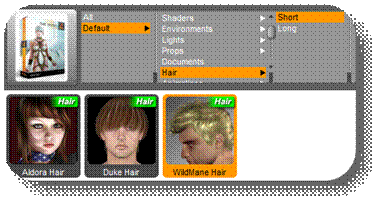
The hair will automatically be placed at the top of the Genesis figure.
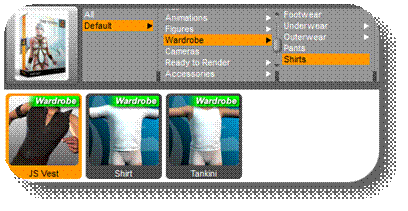
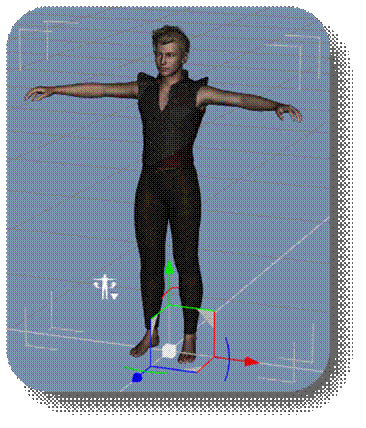
Let's add the 'JS Vest' to the scene.
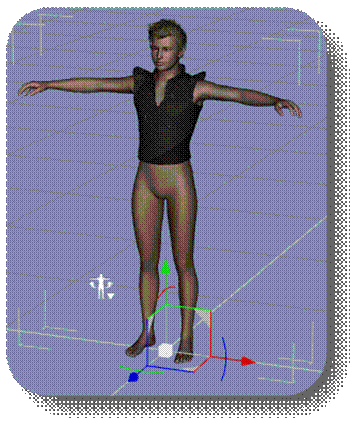
Looking better.
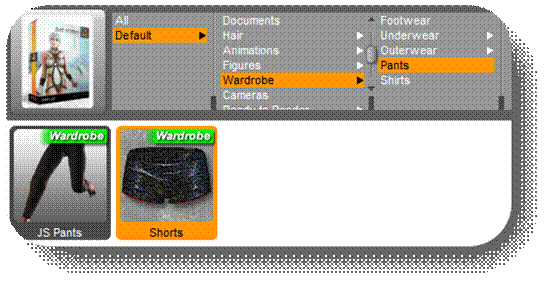
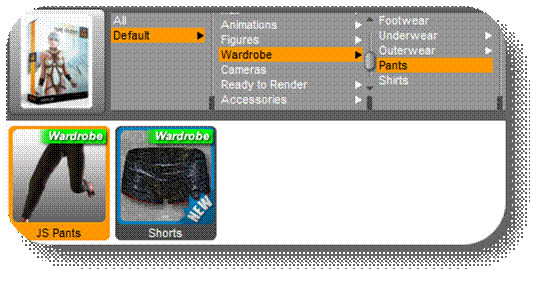
Now let's add the 'JS Pants' to go with it.
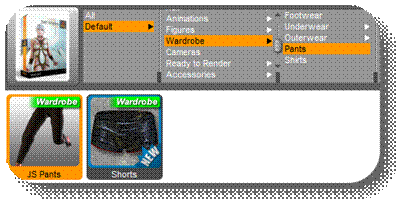
Almost there.
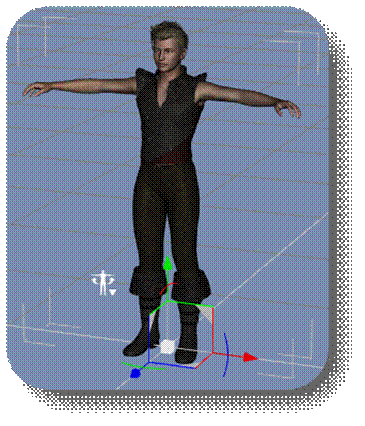
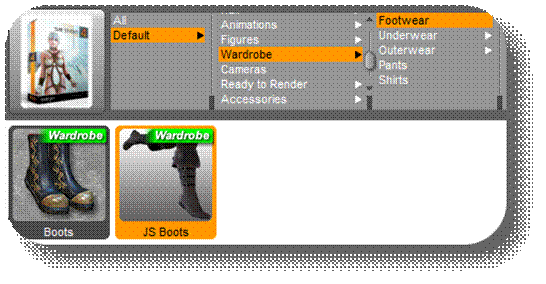
To finish off our character and match his wardrobe, let's give him some 'JS Boots'.

Finished!
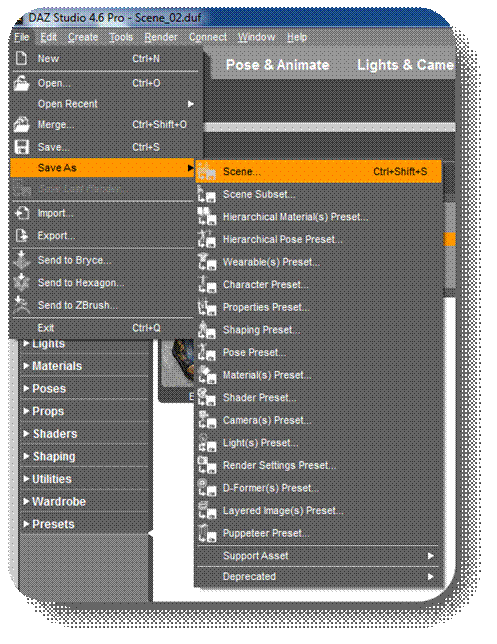
Once you have made a scene you like, it's a good idea to save it periodically. To save your scene, on the main menu go to:
File -> Save As -> Scene
Once you do that a pop-up window will appear for you to pick the location and filename to save to.
Chapter 3: Posing
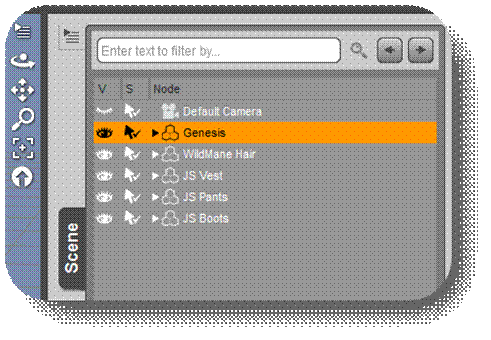
Now we are going to be working on Posing. First off we want to make sure our Genesis figure is selected. On the right side of DAZ Studio you will see the 'Scene' tab, it's above the 'Content Library' tab you used earlier. Once you click on the 'Scene' tab, you will see all the objects currently in your scene. Left-click 'Genesis' to select it.
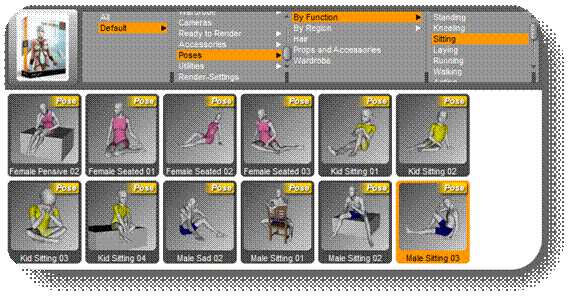
We want our Genesis figure selected so we can add a Pose file to them. A Pose file is a premade pose that we can give to our figure without having to create it yourself. Go to the Starter Essentials bundle and look for 'Male Sitting 03'. Add it to the scene just like anything else.
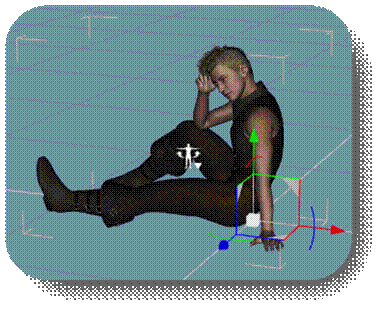
Now our Genesis figure is in a sitting pose.
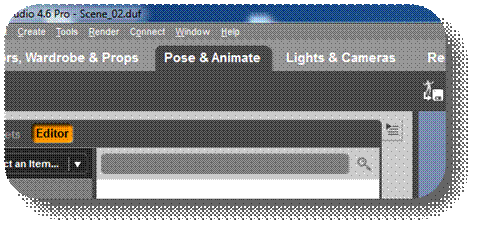
One thing to get familiar with is the 'Pose & Animate' tab. You'll find this at the top of DAZ Studio. Left-click it to start posing and animating your figure. Be sure to click the Editor option.
With your Genesis figure selected, when you open the 'Pose & Animate' tab, you will immediately see options for manipulating the Genesis figure.
Previously we covered using the directional rays that appear when an object is selected. We can use them on our Genesis figure as well.
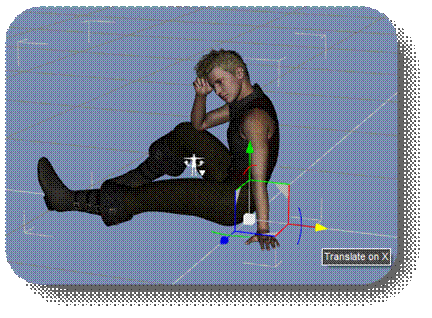
Left-click and drag the X-Axis (red) arrow tip to the right. This will translate (move) your figure to the right along the x-axis.
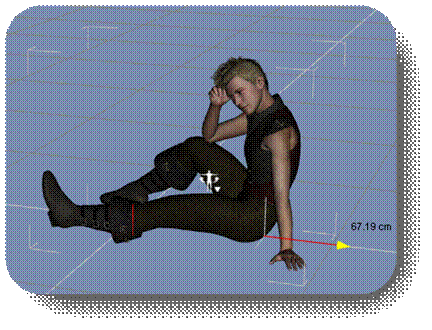
Left-click and drag the Z-Axis (blue) arrow tip forward. This will translate your figure closer to the camera along the z-axis.
Left-click and drag the Y-Axis (green) arrow tip upward. This will translate your figure up along the y-axis.

Now let's translate our figure along two axes at the same time. Left-click and drag on the corner between the Y-Axis and X-Axis, where the green and red lines meet. You will be translating your figure along both the Y and X axes, which means you will be moving him both left or right as well as up or down in one motion.
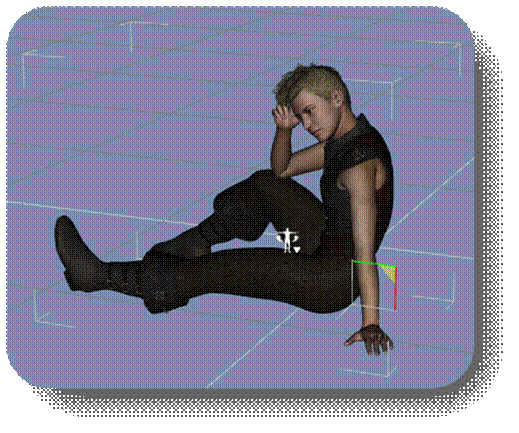
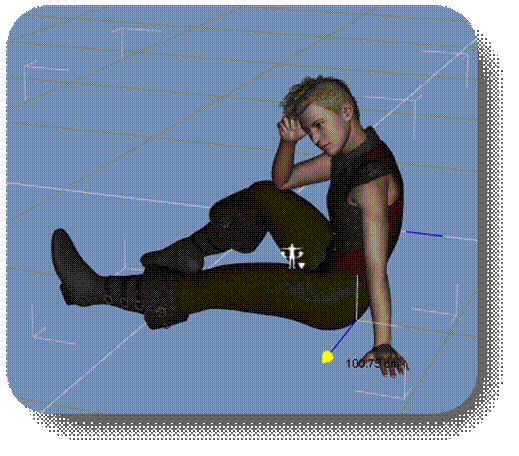
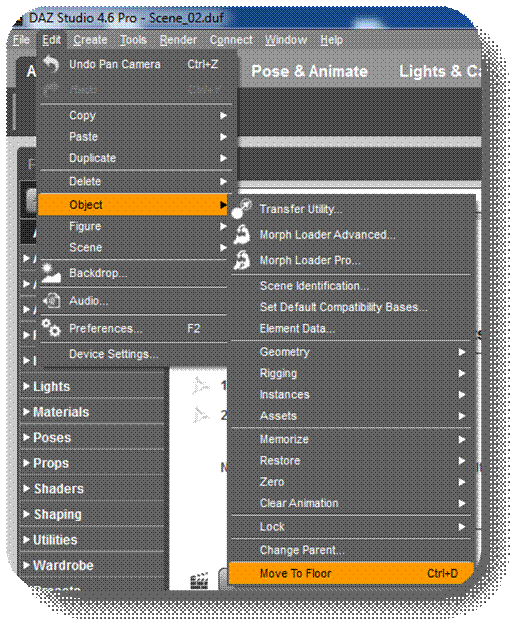
Now that we have moved him around a bit, if for some reason we want him back on ground level (the floor), we can easily do on the main menu by going to:
Edit -> Object -> Move To Floor
Another way of translating your figure is to go back to the 'Pose & Animate' tab and go to the 'Translation' section.
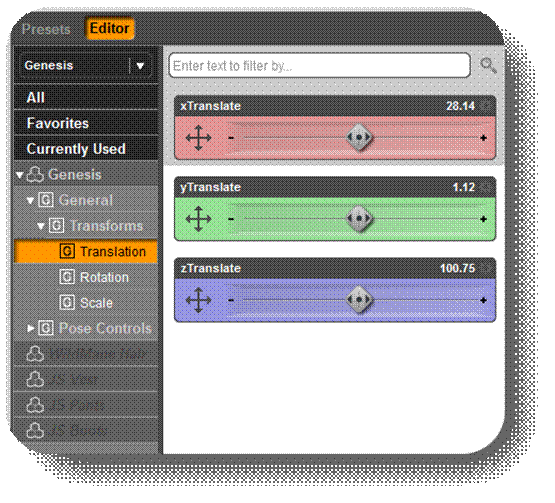
You can translate by dragging the slider to the left or right.
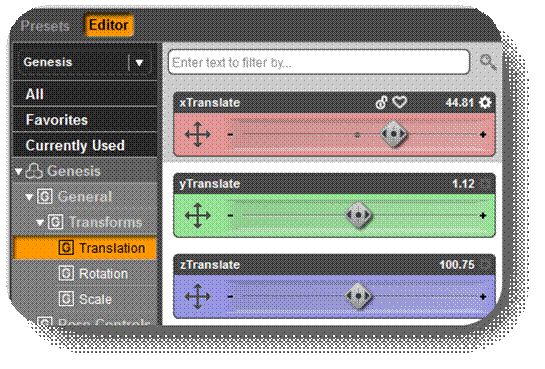
Or, you can type an accurate adjustment by left-clicking on the number above the slider and inputting your desired value.

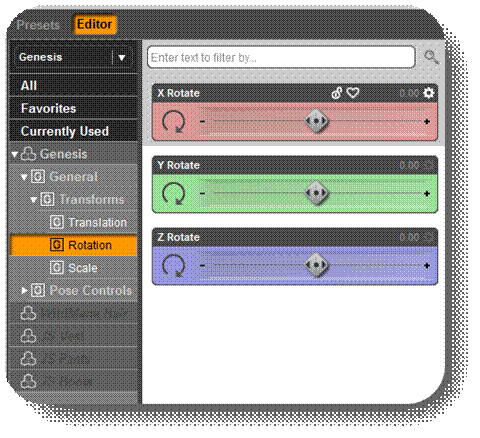
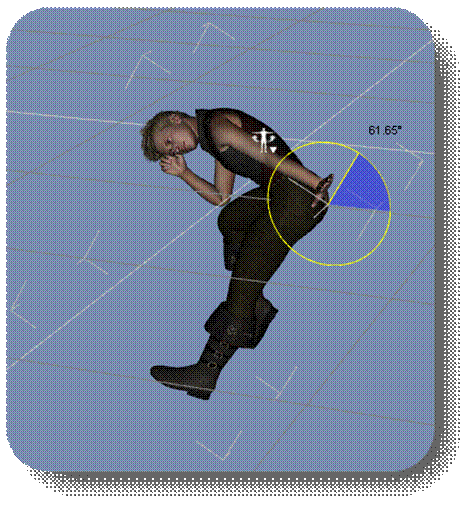
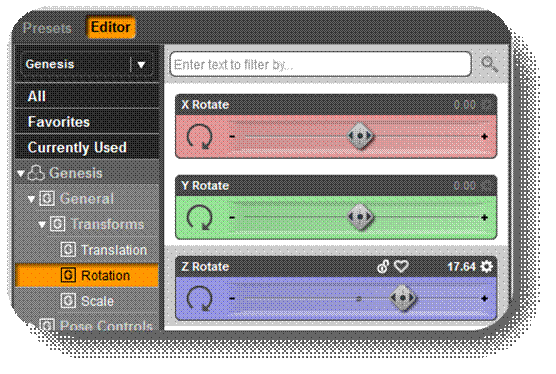
Using the same techniques we've learned, you can rotate your figure.
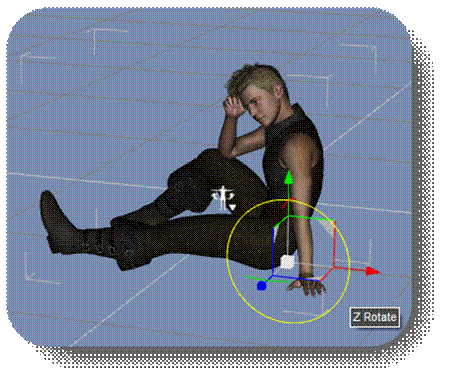
Let's rotate him along the Z-Axis.
We can also freely rotate him along all axes.
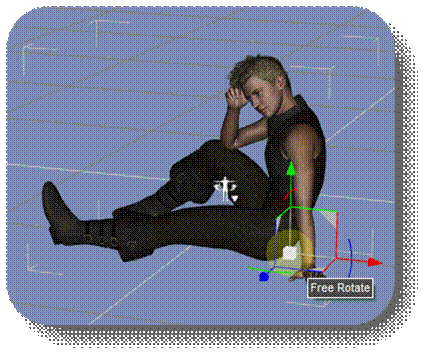
Rotate him around with the Free Rotate.
Just like when Translating him, you can use the Rotate slider in the 'Pose & Animate' section to rotate your figure.
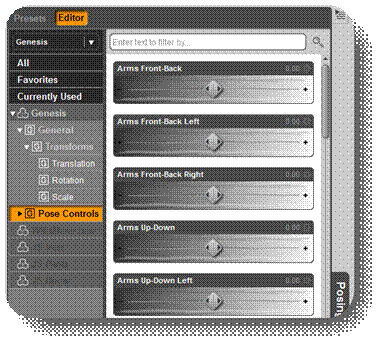
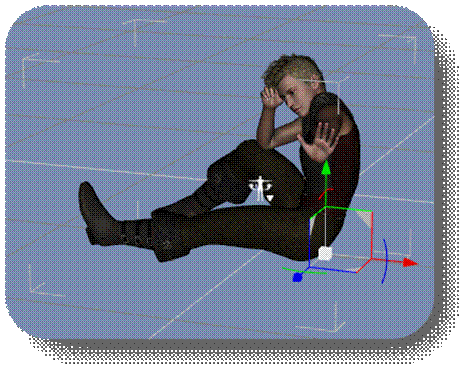
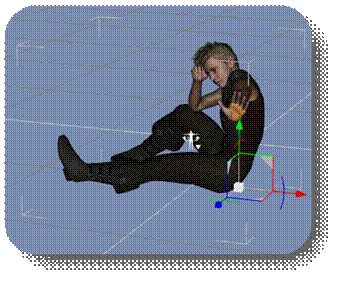
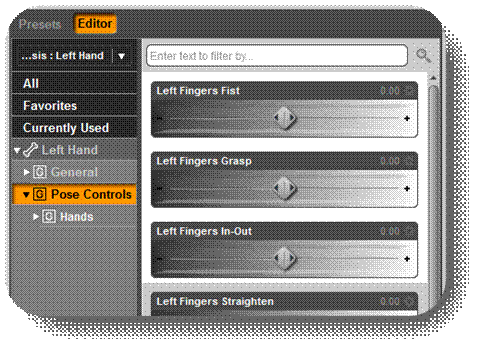
The Genesis figure also comes with some prebuilt options for posing. Go to the 'Pose Controls' and you will see all the different poses you can simulate.
This is what he looks like initially.

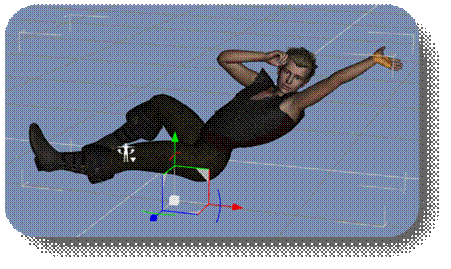
Let's adjust one of the sliders, 'Arms Up-Down Left'. Turn it all the way to 1.00.
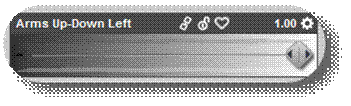
Now his left arm has moved upwards, but Genesis is still in the same general pose.
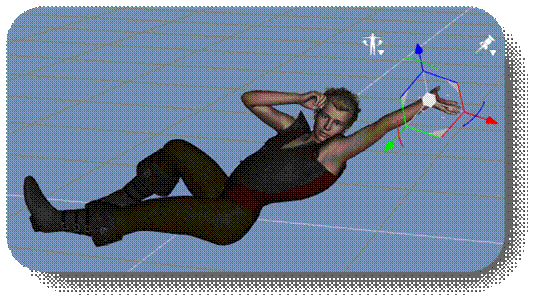
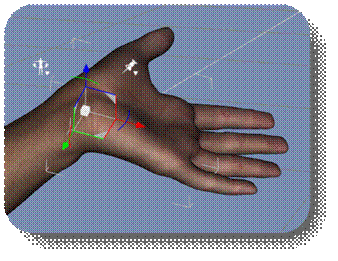
You can also manually pose parts of his body using some Free Hand posing. Just left-click on a body part, in this case I clicked his hand, hold the left-mouse button down and drag.
The body part will move with your cursor, creating a brand new pose. This can be a little unpredictable, so use it cautiously.
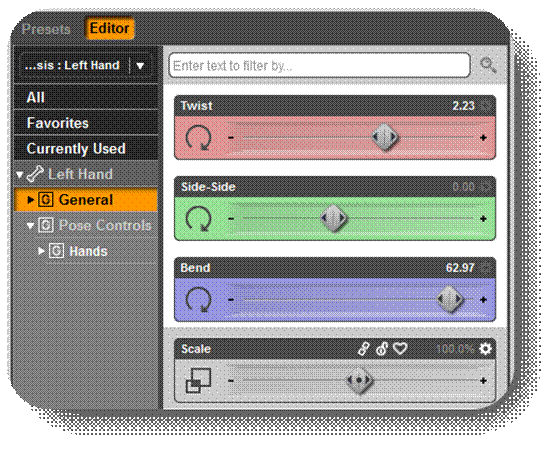
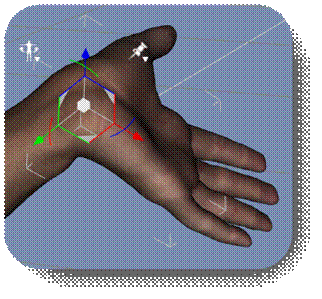
You can also more accurately pose body parts by using the 'Pose & Animate' section. Left-click his hand to select it.
You will see a bunch of 'Pose Controls' that you can use specifically for that hand.
If we go to the 'General' section, we can manipulate the hand specifically using the Twist, Side-Side, and Bend options.
This is his hand initially.
Let's go ahead and drag the 'Bend' slider to the max value of 80.00.
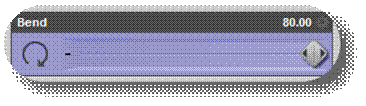
Now his hand is bent backwards even further.
Chapter 4: Constructing Scene

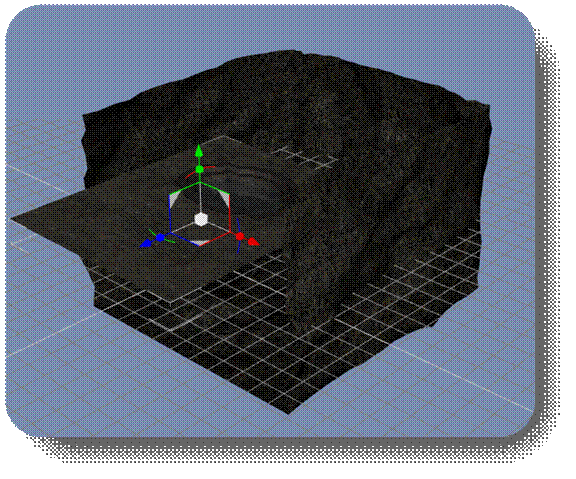
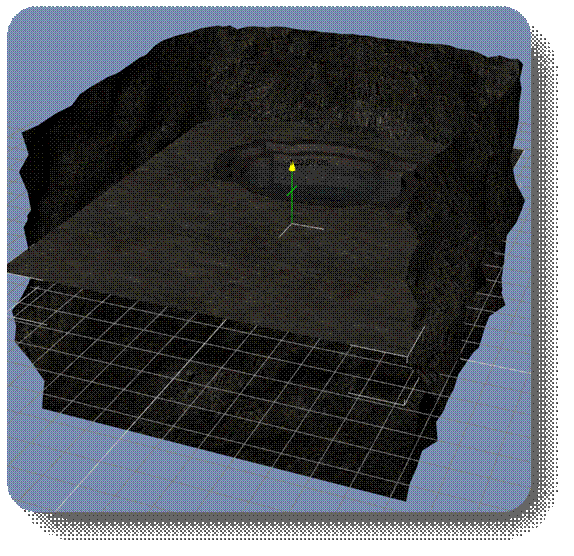
Now it's time to put what we learned together and make a complete scene. Start a New Scene then add some environmental objects to our new scene for our characters to interact with. Add both the 'Cavern' and 'NoAi-Ground' props into the scene.
Once they are both added, they may still need some adjustments.
Move the Ground prop along the Z-Axis back towards the Cavern walls. A value of about "-360.00" should work.

The Ground is a little too small for the Cavern walls, so let's use the General Scale to scale the entire Ground until it touches the walls. Scale the ground up to about 140% so that it connects to all of the surrounding walls.
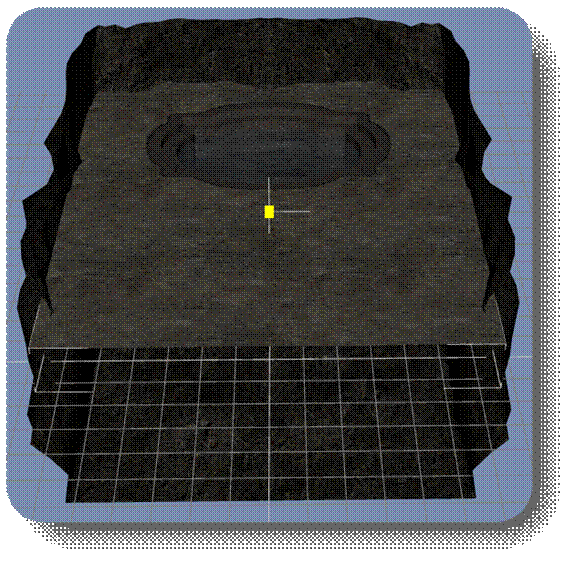
Now let's move it down to the floor like you learned earlier on. Or you can move it along the Y-Axis to set it o the floor grid to make the walls appear higher. If the cavern walls need higher, you can select it and adjust its position on the Y-Axis.
Add the Genesis figure to the scene.
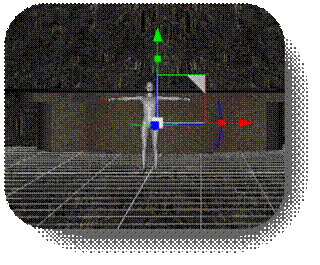
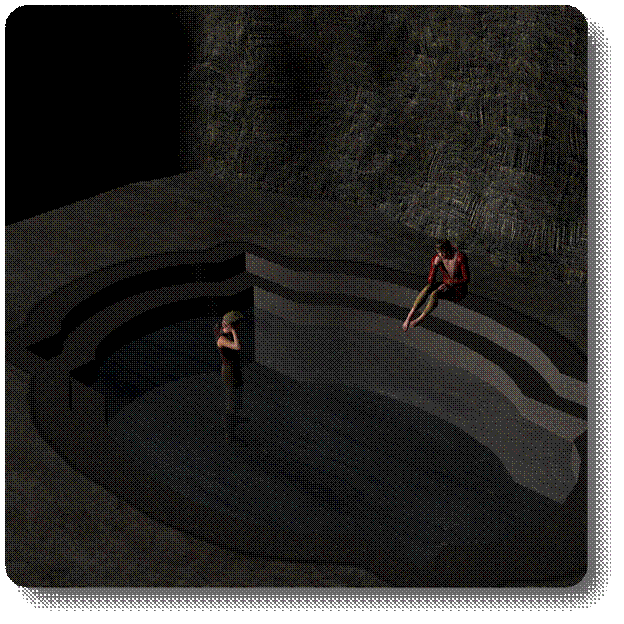
Move Genesis to a spot near the pool at the back of the cavern.
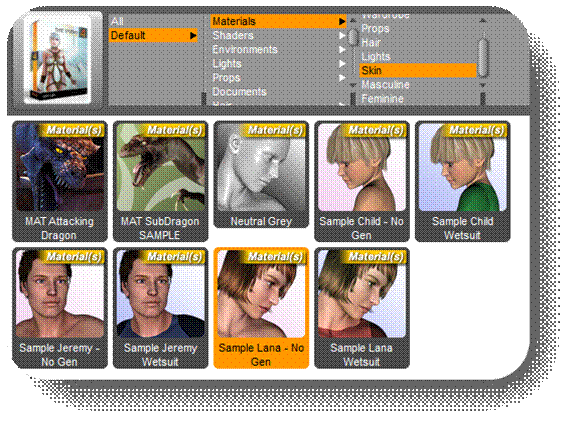
Let's make this Genesis figure a girl. Give her the 'Sample Lana - No Gen' skin.
Let's also give her the 'Aldora Hair'.
Now let's give her some 'Shorts'.
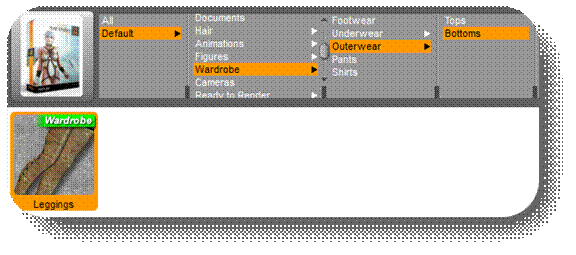
As well as some 'Leggings' to go with it.
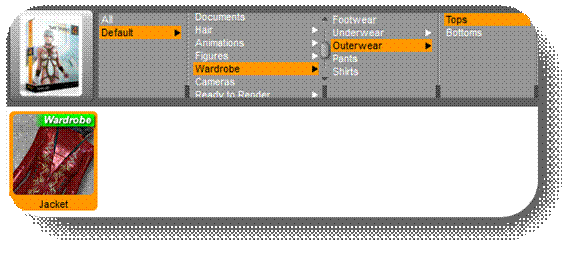
To finish her wardrobe, let's give her a 'Jacket'.
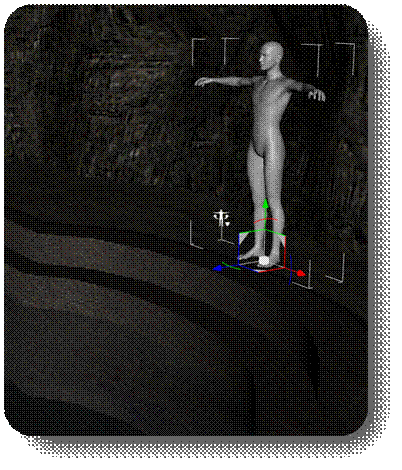
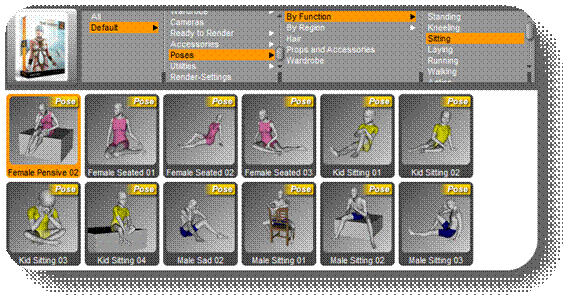
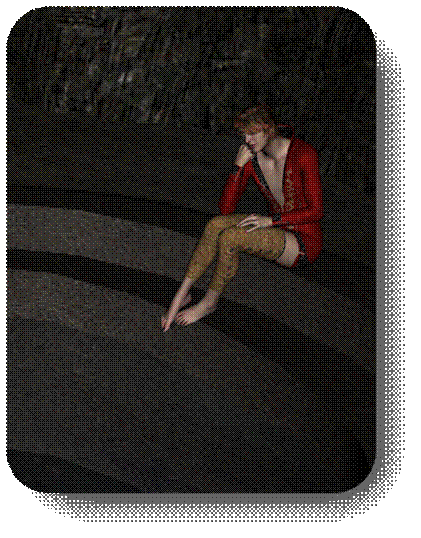
Finally, let's give her a pose, the 'Female Pensive 02' is a good one since she has a pool edge to sit on.
Now just Translate and Rotate her until she fits nicely on the edge of the pool.
Now let's add another Genesis figure to the scene.
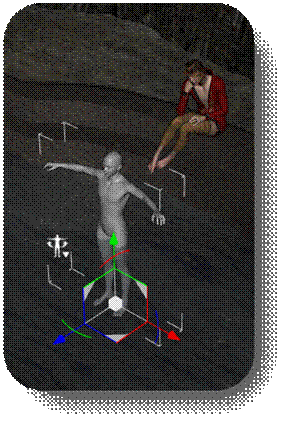
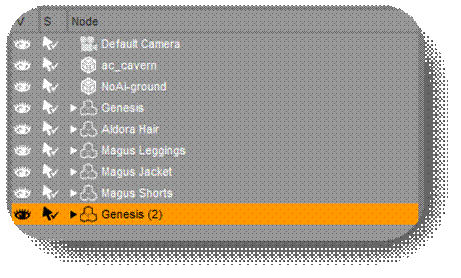
This figure will show up as 'Genesis (2)' so make sure you have 'Genesis (2)' selected so that the wardrobe, poses, and hair we add will be applied to our second figure.
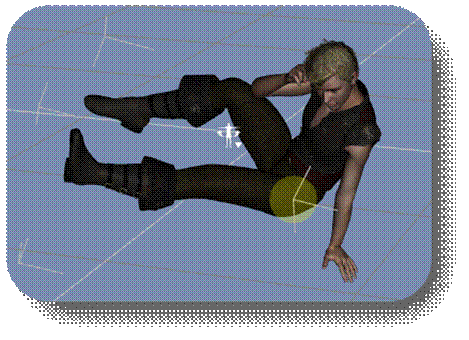
Give Genesis (2) the 'Male Sexy 01' pose.
Let's recreate the Genesis we made in a previous section. Add the 'Sample Jeremy - No Gen' skin.

Add the 'Wildmane Hair'.
Add the 'JS Vest'.

Add the 'JS Pants'.
Add the 'JS Boots'.
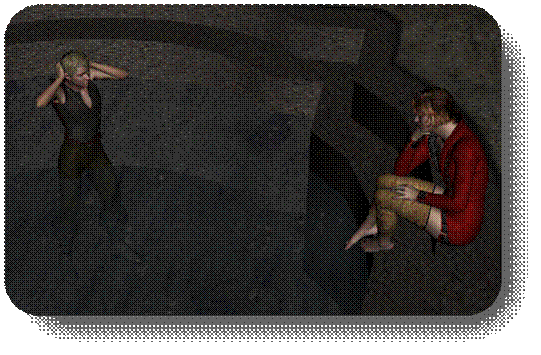
If all was added correctly, your 'Genesis' figure should be untouched, while your 'Genesis (2)' figure received all of the props, the skin, and the pose you gave to them. After that all you need to do is move them into a position that makes sense, in this case I adjusted the 'Genesis (2)' figure to face our 'Genesis' figure. Now move your view into a position where you can see both the figures, because we are going to render the scene.
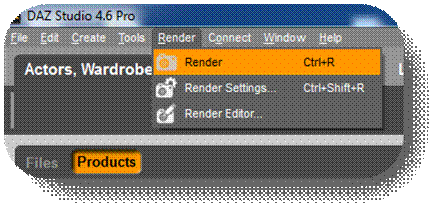
To render your scene, just go to Render->Render on the menu bar, or press Ctrl+R on the keyboard
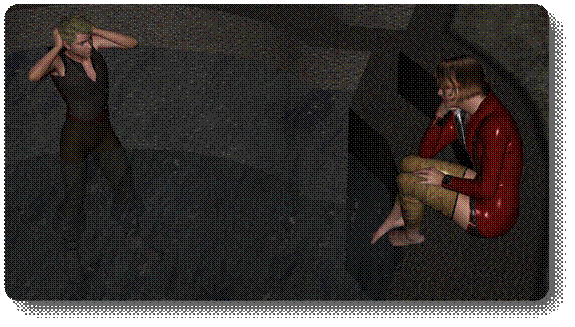
The render will capture what you are looking at, and you can then save the image wherever you want.
Now that you've learned how to use preset poses for your models and even make posing adjustments to individual body parts, you should be able to start creating fantastic scenes of your own.
Complete Scene using Posing Model techniques
Need Portability? Click here for the free PDF version